

Share

Texture Box
What You Need
- 1 Shoebox
- 1 Cardboard box to cut up (you can also use 6 sheets of heavy card stock available at craft stores)
- Safety scissors
- Craft glue
- 1 5×5-inch sheet of bubble wrap
- 1 5×5-inch sheet of sandpaper
- 1 5×5-inch sheet of felt
- 1 5×5-inch piece of fuzzy fabric
- 1 5×5-inch piece of aluminum foil
- 1 5×5-inch piece of burlap
How To Make It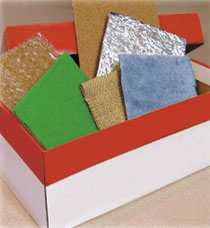
- Cut out one 5×5-inch piece of cardboard for each texture square.
- Cut 5×5-inch squares from each of the different textured materials you have chosen (bubble wrap, sandpaper, etc.)
- Using white craft glue, apply each of the materials to the cardboard squares. Let dry completely.
- To create the Texture Box, place all the finished texture squares into the shoebox.
How To Plat
- Sit across from your toddler with the Texture Box between you.
- Have your toddler choose one of the texture squares and show her how to run her hand over the surface of the square.
- If it’s the sandpaper square, say “rough.” When she rubs her hand over the surface, ask her to say “rough.”
- After she feels all of the squares and you both have named each one, you can go back and ask your child to express which one she likes the best.
- The Texture Box is a great activity to take along and play with your toddler while you are waiting for an appointment or sitting together in the car waiting to pick up an older sibling.